Table of Contents
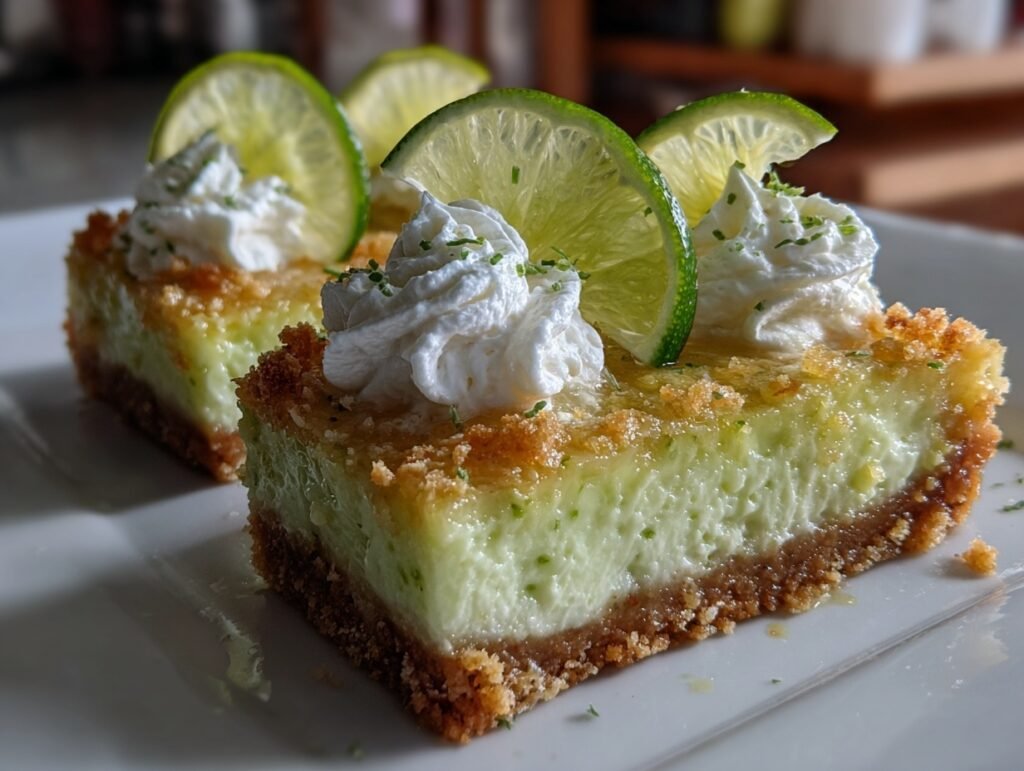
Imagine slicing into a square of Key Lime Pie Bars, where the crumbly golden crust yields to a creamy, vibrant green filling that bursts with zesty lime tang, balanced by a cloud of whipped cream melting on your tongue. The air fills with the fresh, citrusy aroma of key limes, evoking sun-soaked beach days and lazy summer afternoons. Each bite delivers a perfect harmony of sweet, tart, and buttery bliss—irresistibly cool and refreshing, like a tropical escape in dessert form.
These Tangy Easy Summer Dessert Key Lime Pie Bars are a Pinterest dream: visually stunning with their neon lime hue contrasting the fluffy topping and lime slice garnishes, ready to steal the show on your feed. No-fuss assembly means you can whip them up in under an hour of active time, delighting crowds at barbecues, picnics, or potlucks. For more key lime inspiration, check out Food Network’s key lime pie collection. They’re the ultimate shareable treat that screams “pin me now!”
Why You’ll Love This Recipe
Key Lime Pie Bars come together in a snap, with a press-in crust and no-bake filling that bakes to perfection in just 20 minutes. You’ll love the quick prep that frees up your day for fun, while the glossy lime surface and whipped peaks create Instagram-worthy slices everyone snaps photos of. The emotional high? That “wow” moment when guests rave about the bold flavor punch.
Versatile for any occasion, these bars shine at summer parties or cozy gatherings, pairing effortlessly with fresh berries or iced tea. Their shareability skyrockets with easy slicing into perfect squares—ideal for gifting or potlucks. The visual wow-factor of emerald filling topped with cream turns every bite into a celebration, making you the dessert hero.
Ingredients

These simple ingredients unite for magic: graham crumbs and butter form a buttery, crunchy base; egg yolks, condensed milk, and fresh key lime juice create a silky, tangy filling that sets firm yet creamy; while whipped cream adds airy lightness. Lime zest amplifies the vibrant citrus pop, ensuring every layer harmonizes in flavor and texture.
For the Crust:
– 1 1/2 cups graham cracker crumbs
– 1/3 cup unsalted butter, melted
– 1/4 cup granulated sugar
For the Filling:
– 4 large egg yolks
– 1 (14 oz) can sweetened condensed milk
– 1/2 cup fresh key lime juice (or regular lime juice)
– 2 teaspoons lime zest
– 1/4 teaspoon salt
For the Topping:
– 1 cup heavy whipping cream
– 2 tablespoons powdered sugar
– Lime slices for garnish
Quick Overview
– Prep Time: 20 minutes
– Cook Time: 20 minutes
– Total Time: 40 minutes (plus 4 hours chilling)
– Servings: 16 bars
– Difficulty Level: Easy
Chill time ensures perfect setting, but hands-on effort is minimal—ideal for busy days. Bake, cool, and slice for instant gratification without fuss.
Step-by-Step Instructions

Get ready to create these crowd-pleasing Key Lime Pie Bars with confidence! This foolproof method delivers a creamy, tangy center in a buttery crust, topped with fluffy cream. Follow these steps for bar perfection every time.
1. Preheat your oven to 350°F (175°C). Line an 8×8-inch baking pan with parchment paper, leaving overhang for easy removal. This ensures clean slices later.
2. In a medium bowl, stir together 1 1/2 cups graham cracker crumbs, 1/3 cup melted unsalted butter, and 1/4 cup granulated sugar until it resembles wet sand and holds together when squeezed.
3. Press the crumb mixture firmly into the bottom of the prepared pan using the back of a measuring cup. Bake for 10 minutes until golden brown and fragrant. Remove and cool slightly.
4. While crust bakes, whisk 4 large egg yolks in a large bowl until pale and slightly thickened, about 2 minutes with an electric mixer on medium speed.
5. Add 1 (14 oz) can sweetened condensed milk, 1/2 cup fresh key lime juice, 2 teaspoons lime zest, and 1/4 teaspoon salt to the yolks. Whisk vigorously until smooth and slightly thickened, about 1-2 minutes. It should look creamy and pourable.
6. Pour the filling over the warm crust, spreading evenly with a spatula. Bake for 15-18 minutes until the edges are set and the center jiggles slightly like gelatin—don’t overbake for creamy texture.
7. Cool the pan on a wire rack for 30 minutes, then refrigerate for at least 4 hours (overnight is best) until fully firm and chilled.
8. For topping, beat 1 cup heavy whipping cream with 2 tablespoons powdered sugar in a chilled bowl until stiff peaks form, about 2-3 minutes. Spread or pipe over chilled bars.
9. Lift bars from pan using parchment overhang. Cut into 16 squares with a sharp knife, wiping between cuts for neat edges.
10. Garnish each Key Lime Pie Bar with thin lime slices for a pop of green color and fresh appeal. Serve chilled.
Pro Tips for Perfect Results
Nail these Key Lime Pie Bars with these insider secrets for unbeatable texture and flavor.
Room Temperature Yolks: Always use room-temp egg yolks for smooth, lump-free filling. Cold ones can cause curdling—let them sit out 30 minutes.
Fresh Juice is Key: Squeeze limes fresh for bright tang; bottled lacks zest punch. Roll limes before juicing to maximize yield.
Firm Crust Press: Pack crumbs tightly to prevent soggy base. A flat-bottom glass works wonders for even, sturdy layers.
Chill Thoroughly: Minimum 4 hours sets the filling to creamy perfection—rushing leads to runny slices. Overnight yields pro results.
Whip Cream Cold: Chill bowl and beaters for cream that holds peaks. Overbeating turns it buttery, so stop at stiff stage.
Sharp Knife Slices: Warm blade in hot water, dry, then cut for clean edges that showcase the vibrant layers beautifully.
Zest Boost: Double zest if you love intensity, but avoid white pith for bitterness-free lime bliss.
Serving Ideas & Variations
Elevate your Key Lime Pie Bars into showstoppers! Arrange squares on a white platter with extra lime slices and mint leaves for a tropical vibe—perfect for summer barbecues where the creamy green glows against the sun. Pair with chilled sparkling water or fresh lemonade to cut the sweetness, or alongside grilled chicken for a picnic feast that balances tangy dessert with savory mains.
For brunch wow, top with crushed graham crackers or toasted coconut flakes, mimicking a beachside treat. These bars shine at baby showers too—stack mini versions in jars for portable elegance.
Variations keep it fun: Swap lime for lemon juice and yellow zest for zingy Lemon Bars; add 1/2 cup crushed macadamia nuts to crust for nutty crunch; or swirl in raspberry puree before baking for berry-lime swirls. Vegan twist? Use coconut condensed milk and aquafaba whipped “cream.” Each tweak maintains the Tangy Easy Summer Dessert magic.
Nutritional Highlights
These Key Lime Pie Bars pack joy with smart perks: lime juice delivers vitamin C for immune support and antioxidants for glowy skin; egg yolks offer protein and healthy fats for satiety; while the crust’s graham provides fiber for steady energy.
Per serving (1 bar): ~280 calories, 5g protein, 32g carbs (1g fiber), 15g fat (9g saturated). Indulge mindfully—the tang curbs overeating, making it a balanced treat.
Storage Made Simple

Store Key Lime Pie Bars in an airtight container in the fridge for up to 4 days. The chilled filling stays creamy, and flavors deepen beautifully. Cover loosely with plastic wrap to prevent smudging the whipped topping—grab a square for instant refreshment anytime.
For longer storage, freeze bars (ungarnished) in a single layer on a parchment-lined tray until solid, then transfer to a freezer bag for up to 2 months. Thaw in the fridge overnight; re-whip cream if needed and add fresh lime slices. No reheating required—these taste best cold for that perfect summer chill.
FAQs
Can I use regular limes instead of key limes?
Yes! Regular lime juice works perfectly in Key Lime Pie Bars, offering similar tang with easier availability. Key limes are smaller and more floral, but regulars yield the same creamy results—just zest and juice fresh for best flavor.
How far ahead can I make these bars?
Make Key Lime Pie Bars up to 2 days ahead; the filling sets even better overnight. Bake, chill fully, add topping just before serving to keep it fluffy. Perfect for party prep without last-minute stress.
Why is my filling runny?
Runny filling usually means underbaking or insufficient chill time. Bake until center jiggles lightly (15-18 mins), then chill 4+ hours. Fresh juice and room-temp yolks prevent separation—troubleshoot by baking 2 extra minutes next time.
Are there nut-free options?
Absolutely, these Key Lime Pie Bars are naturally nut-free. Stick to the graham crust, or swap for gluten-free crumbs if needed. Top with extra lime zest for crunch without nuts.
How do I scale for a crowd?
Double the recipe for a 9×13 pan—yields 24+ bars. Use the same bake times, but watch closely as larger batches set faster. Chill fully for easy slicing at big events.
Can I make these gluten-free?
Yes! Use gluten-free graham-style crackers for the crust. Everything else is naturally GF. Press firmly and bake as directed for the same buttery, tangy Key Lime Pie Bars delight.
What if I skip the whipped cream?
No problem—bars stand alone with bold lime flavor. For lighter topping, use Greek yogurt mixed with powdered sugar. It adds creaminess without heaviness.
Final Thoughts
These Key Lime Pie Bars are your ticket to summer dessert stardom—tangy, creamy, and effortlessly stunning. One bite, and you’ll be hooked on their zesty charm that lights up any gathering.
Pin this now, bake today, and watch the shares roll in! Tag friends who need this Tangy Easy Summer Dessert in their lives—your feed (and taste buds) will thank you. Sweet dreams await!